Когда встречаешь соседа и спрашиваешь: "Четамснегидетеще?",
А он тебе в ответ такой: "Что?"
Не нужно еще раз повторять фразу. Очевидно, что набор звуков ему не зашел, и не зайдет и во второй раз. Нужно просто переспросить: "Снег.... еще... идет?.. там"
Необходимо переставить слова и сделать паузы, и тогда мозг сразу все сопоставит. Можно и без пауз, но слова надо переставить. Делать творческие усилия ради понимания -- это правильно.
Сколько раз наблюдал сцену, когда один вопрос задавался три раза и в ответ было вот это вот "Что?"
It represents all ships available in the game and gives you info on how hard points, utilities and other viable modules and parts are placed on each ship. It also provides the view of gunsights at different targeting ranges, so you may check if placing fixed-mounted weapons will work against Thargoid :)
Preamble
I created it for two reasons. Firstly, I love to draw, and I am completely satisfied with the time spent. Secondly, there are no such info neither in game, nor in public sources. I will explain what I mean.
Since http://www.elite-dangerous-blog.co.uk, one of my referral links, has the nicely done blueprints, it lacks gunsight views, landing gears, heat vents, and full of small mistakes/misplacements. I guess, my work is full of mistakes too, but I'm going to root them all out with the time ;)
Second referral link is Elite Dangerous Wiki https://elite-dangerous.fandom.com/wiki/Elite_Dangerous_Wiki. I used it to get ship dimensions and additional screenshots. But it gives only a general view of the ships.
Even in game you commonly can't understand which utility is mount where. And how weapons are placed. EDSA provides this info as best as I can made it.
I'm not planning to make it another Coriolis or Inara. They are the best tools for Elite, so beautifully made. But I'm open for collaboration.
What I'm planning is to add SLFs, and placements of internal core modules, and maybe additional info (and video), including builds for each ship. If it would be helpful.
Features
There are blueprints of all flyable ships available in Elite Dangerous on the EDSA:
Adder, Alliance Challenger, Alliance Chieftain, Alliance Crusader, Anaconda, Asp Explorer, Asp Scout, Beluga Liner, Cobra Mk III, Cobra Mk IV, Diamondback Explorer, Diamondback Scout, Dolphin, Eagle, Federal Assault Ship, Federal Corvette, Federal Dropship, Federal Gunship, Fer-de-Lance, Hauler, Imperial Clipper, Imperial Courier, Imperial Cutter, Imerial Eagle, Keelback, Krait Mk II, Krait Phantom, Mamba, Orca, Python, Sidewinder, Type-6 Transporter, Type-7 Transporter, Type-9 Heavy, Type-10 Defender, Viper Mk III, Viper Mk IV, Vulture, F63 Condor, Gu-97, Taipan, XG7 Trident, XG8 Javelin, XG9 Lance.
I added 3 color themes, white, blueprint and dark. This is blueprint-inspired one:
Also it's possible to change module hooks appearance and gunsight target.
See, how hard to target Thargoid heart while piloting T-10 :)
Core and optional internal modules
For some ships I've added placements of core and optional internals. There are 10 ships of such kind only yet, because all of them are SLF-capable. I need to cooperate with my friends to make all others. This will take some time I suppose. So if you have a ship and are willing to help, you are welcome. Your ship must be equipped with limpet controllers in ALL optional slots except military ones. In military slots you should place shield cell banks. All other components do not matter. I will meet you anywhere in the Bubble as soon as we both are ready. It usually takes about 10 minutes to screenshot one ship.
Internals have their dimensions, but all info we can uptain is just markers. So eventually I decided not to generate my own view on what dimensions are, and leave markers only as they are.
This Beluga Liner provides a good look on how this thing works. To be honest, I was afraid of internals placed illogically, you know. But I was completely satisfied with how precisely they were located.
How it was made
I didn't use any of datamined materials. I simply take the ship, load it with weaponry, fly to the navigation beacon, and screenshot the ship with all views I need. Then I outline images in my lovely Incscape editor.
For some ships it's hard to get which weapon corresponds particular pip in the gunsight. So I made a lot of small pictures.
After outline work is done and blueprint's ready, the most exciting part comes. To place hooks (as I call them) atop of image to mark the position of the modules. Since it's SVG, it's easy to add JSON description for elements to identify them.
The final images are saved as vector graphics, so they are easy to scale and have a low weight (20-40 KB). Each ship took me about one and half hour on whole procedure.
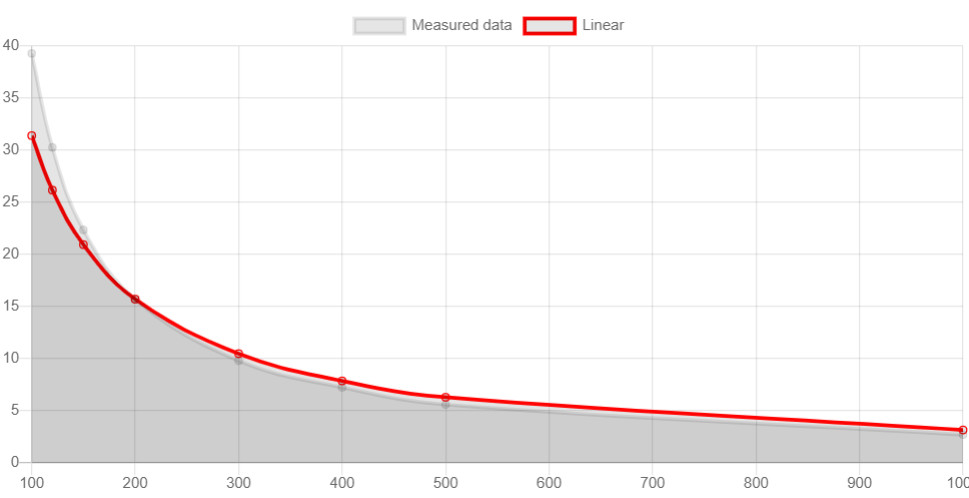
How gunsight works
Pips position in gunsight depends on the distance. And it's simple. With doubling the distance, the angular size is cut in half. So I thought. But I didn't count perspective focal distortion of the camera.
The red line shows how the linear angular size changing with distance. And it doesn't hit the measured values.
So I added some exponentiations to make it the same.
And then I got the second problem. Different ships have different sensor placements and it is not the same place where cockpit located. For example, Corvette has it sensors positioned 60 meters before the cockpit, so you see same sized objects with different angular size in Corvette and Assault Ship.
So I added another coefficient. And now it looks monstrous.
But with this equation I need to make just 2 gunsight screenshots. First from 200 meters to target, and second one from 100 m. By finding first root of square equation I get sensor coefficient k (thank gosh it's not tensor one). And then, knowing it, I can calculate pip position r for any given distance.
The same calculation helps to place target ship in gunsight.
Conclusion
It was a really cool time writing this small project and drawing so many images. As always, all images and source codes are free to copy.
If you are worried that internet traffic will eat all my quotas, please feel free to donate ;) This will make Cutter and Clipper to look more happy...
Thanks
to CMDR [Dax] for listening to all my whining while I worked on the project. I appreciate this so much. He also helped me with his ships to calibrate gunsight equation. He is my fellow wingman, after all.
to CMDR Col_Cassad and CMDR Sylvanas Cry for helping in mapping of ship disembark sites in Odyssey.
to CMDR Ivan Orekhov for dedicated help with screenshots of his Cobra Mk IV.
As it utilizes javascript Gamepad API, it can support up to 4 devices.
It's highly recommended to use Chrome-based web browser since Firefox doesn't see all possible axes.
Important notice. The Joystick Visualizer does not store your personal data, nor uses cookies. All presets you'd made are stored at your web-browser local storage.
The visualizer was (in primary) created for using whilst playing Elite: Dangerous. Of course, it may also be used in other various simulator games. My friend CMDR [Dax] requested visualizator that is as much flexible as possible to freely support his 2 joysticks with throttle and pedals setup.
This visualizer is good at use as a "Browser" source in OBS application.
I asked CMDR [Dax] to give me a sight on his experience of using the visualizer with OBS. Here is his comprehensive answer: Using Joystick Visualizer in OBS.
Step 1. Configure widgets.
- go to a.teall.info/joystick/
- double click anywhere to add widget. You may use buttons, hats, labels and single or double axis widgets.
- configure widgets. Double click on widget, set label(s) and joystick(s) and axis number(s). These numbers you can find using the "Joysticks" menu.
- configure general settings like shadows, colors etc.
- save yor settings.
Step 2. OBS.
Well, you will need to experiment a bit with settings to achieve decent results.
Disclaimer: These are mine personal recommendatons. They work for me, your mileage may vary.
At first, choose a proper color for your chroma key background. The usual acid green is not always the best option. We'll need a bit of theory here.
The ChromaKey technology works as a dynamic mask determined by the color. This color is filtered out by software during the video processing and all areas of that color are considered as transparent.
This works very well with sharp-edged objects, where we have a distinct border between the colors. But if you have any kind of antialiasing, shadows or edge feathering involved, things are more complicated because of the process called "color spill" which is basically a blending of the colors at the edges of an object. To minimise this effect you need to choose the chroma key color which is:
a) opposite to the color of the object
b) not very bright
Some numbers to illustrate this:
Every color is composed from 3 basic color channels - Red, Green and Blue. In 24 bit color palette each color value can be from 0 to 255 (or from 00h to FFh in hexadecimal notation)
#ff7100 - this is the code for orange color of Elite Dangerous. As you can see, it consists of 255 (FFh) Red, 113 (71h) Green and 0 (00h) Blue. Since this orange color does not contain Blue channel at all, a kind of blue chroma key color will be easiest to remove and is the best choice for orange widgets. Also, it should be not too bright, because the dull colors "spill" less. The shade of blue with code #000080 shoud work just fine.
Chroma key color should be set in "Settings" menu of Teall Joystick site. Save your configuration and then use "Export" in the "Save" dialog. You will see the "Direct link" option, copy that link.
Now we need to add this to OBS.
In OBS add new "Browser" source.
Insert the link that you have copied from the website to the "URL" field and set desired browser window size. I recommend to start with the size of your video frame and than reduce it to the minimal required dimensions later. When you click OK, you should see your widgets in the OBS along with chroma key background. Now we need to remove it.
Right click on browser you have just created and choose "Filters". Click on "+" an add "Chroma Key" fiter.
Set "Key Color Type" to "Custom" and choose chroma key color either by using palette\number fields or color picker.
Now is the time for fine tuning.
Set "Similarity", "Smoothness"and "Key Color Spill Reduction" to minimum.
"Similarity" is how close to the base color you want OBS to remove. Adjusting this slider will allow OBS to remove wider chroma key color variations of the screen. Make sure not to increase this so much that some parts of your widget is being removed too.
Adjust "Similarity" so you can see the widgets clearly with minimal residue of chroma key color. It should be small value in our case since we have very uniform key color.
"Smoothness" works in tandem with "Similarity" in trying to make sure that the filter isn’t too harsh. You shouldn’t have to move this to a large degree. Use it to hone in on the perfect amount of what’s left on the screen.
"Spill Reduction" applies to the edges of what the filter is and isn’t removing from the screen. If you're noticing some key color residue on the edges of your widgets, move this slider to remove it.
Most probably, you will need to disable shadows in the website settings to get better results. This largely depends on used color schemes though.
Step 3. Final adjustments.
As the last steps, adjust widgets placing (you will need to save new settings and apply new URL to the OBS browser) and OBS browser overlay size. After the overlay size has been roughly set, you may crop the overlay instead of resize by holding "Alt" key while adjusting overlay borders.
Please note, that chromakey processing is a tough computational task, so you will need a computer with a decent CPU to avoid lags and framedrops.
As always, Joystick Visualizer is completely free for use and copy. If you like it, feel free to donate =)
Today we were at dacha to clear snow and put some amount of snow inside greenhouse. And have thought, hey, it's the Maslenitsa today, so why not to make and burn the Lady Maslenitsa?
As we finished with snow, we realised we have time for this. Old slavic holiday is still alive, after all, even Christian Church have failed to cut it out.
Materials selected were newspapers and serviettes. The Lady is about to get burned.
It looks sadistic, but this is not the Spanish Inquisition, this is just old slavic joke.